Showing posts with label DIY. Show all posts

Monday, January 5, 2015

DIY Play Kitchen Showcase


Heeeey.

I'll skip the "I'm so sorry I left you, I'll never do it again" speech and be real. Life has been busy and I'll probably go missing again for periods of time BUT for now I'm back and I'm back with a bang!

As you are all aware, it was just recently Christmas. T and I have gone back and forth on how we want to approach this holiday that has a ton of meaning for us as Cali gets older and we (hopefully) add to our brood. One of the things that we've settled on is that we never want it to be too commercialized and focused too heavily on presents. We settled on 3 presents this year for her and so I knew I wanted them to be great. 

Every time I take Cali to the gym, church, other kids' houses, etc., she always finds the play kitchen if there is one and will settle in for the remainder of her stay. I knew I had to get her one for Christmas because the one she has is a cheap plastic thing that always falls over on her. But looking at the good, wooden ones online, they were upwards of around $200. 

I didn't want to pay that. 

SO, luckily for me I have a very crafty family and enlisted the help of my cousin, Maddox, to "upcycle" me one from an old TV stand. If you go on Pinterest there are exactly 4,678,375,254 tutorials on how to do this.

Don't question me. I'm telling you it's true.

So anyways, Maddox killed it for $25!!! 

DO YOU HEAR ME, PEOPLE?!? TWENTY. FIVE. DOLLARS. 

So of course I had to show it off to you. 

And while I'm at it, I'll walk you through what Cali's cooking today.


Isn't it BEAUTIFUL?!?

We love it.


The fridge is a bit bare but no worries. We (I) have big plans. 

;)


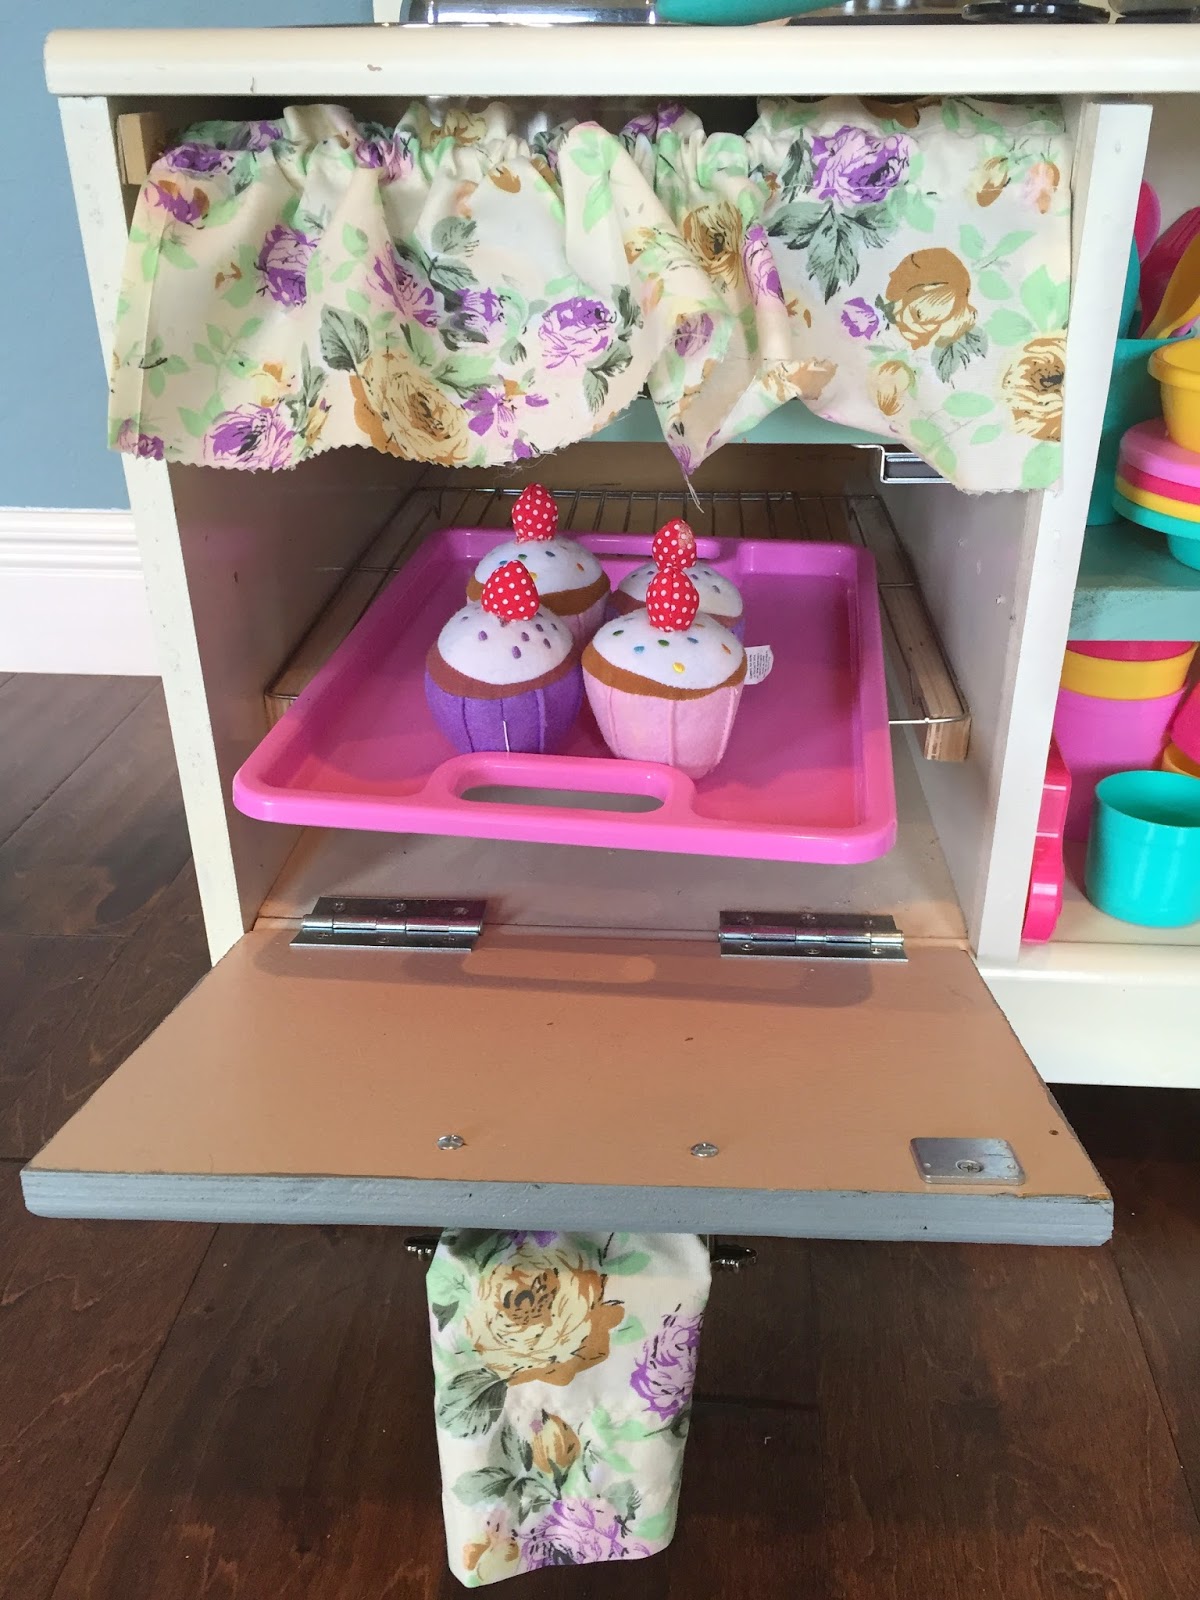
On the menu for today's dessert are these adorable, felt cupcakes from Old Navy.


Mmmm. Melt in your mouth. 


She's also whipping up some hearty vegetable soup.

Though, I have to brag to most of you that are stuck in the cold and snow because we're currently in the South of Florida and it's in the high 70's so we really don't need the soup to keep us warm.

I'm not sorry about this.


We are also having some grilled veggie sandwiches and fried eggs.

Tim's sister got Cali this great recycled sandwich set. You can find one like it here.


Let's talk about these eggs for a minute...


This is another thing Maddox made to go with the kitchen and they're one of Cali's favorite details.


She sewed the "yolk" onto the felt "egg white" and put them in plastic eggs. 

ADORABLE. Right?

Anyways. I highly suggest that you make one of these if you have a toddler. Or have someone make one. Whichever.

This will keep Cali entertained for, literally, HOURS. If we're not swimming, we're cooking in her kitchen.

Yup. You read that right.

It's January and we're SWIMMING.

Outside.

Guys, I've been in Boston for the last 5 winters. I am allowed to brag about this for a minute.

Ok. I hope you all had a great Christmas and I'll "see" you soon.

;)


If you like what you just read please click to send a quick vote for me on Top Mommy Blogs- The best mommy blog directory featuring top mom bloggers

Thursday, December 12, 2013

DIY Yarn Wrapped Letter


I'm not really crafty at all, so you've been forewarned. But I am trying to do a lot of handmade gifts for Christmas and I actually liked the way this one turned out. I love yarn wrapped things and I thought that my cousin, Maddox, would too. Well, I hope she does anyways because that's what she's getting for Christmas. 

This craft is really pretty simple as long as the letter you're doing doesn't start with an M… or W I suppose. That point in the middle was a pain in my

You get it.

She better like this because I've burnt my fingers and my skin is raw. Anyways, here we go.

You'll need scissors, a cardboard letter, yarn, and a hot glue gun (not pictured).


The first thing I did was to glue an end to the backside of the letter. We want to cover the ends first.


Once I wrapped the ends on both sides, I made sure the loose ends were glued down.


The tricky part, like I said, was the middle point but I just hot glued the mess out of it and winged it. Just make sure you're pulling tight and wrap, and wrap, and wrap, and wrap, and wrap, and keep wrapping until you have the desired thickness.


VOILA! Not too shabby.


Sooo….

Merry Christmas, Maddox! Ha! 

Surprise!

{FREE} Printable Gift Tags

Well, hello there :)

I'm just popping in to drop off another FREEBIE! Again, this one is for all of you procrastinators, like me, who haven't wrapped any presents 2 weeks before Christmas. As with the last free printable, just click the link below the preview page. The link will direct you to a PDF page with 12 tags. Once it's printed out, just cut along the outline provided and punch a hole. 

I hope you are having a happy holiday!


Wednesday, December 4, 2013

{FREE} Holiday Chalkboard Printouts


Good morning!

Or, afternoon. Good (insert whatever time of day you're reading this).

Cali and I are down with colds but I wanted to *stop in* and give you a fun freebie! Who doesn't love freebies?

It's that time of year and if you're looking for FREE ways to add some holiday cheer to your home, you've come to the right place. I have 5 free holiday chalkboard printouts for you. You can have them printed on canvas from somewhere like WallyWorld, or simply print them out at home and put them in a simple frame. Either way, they're sure to bring some winter into your life :)

They're all 8x10 size and in PDF format. Simply click the link below each preview picture and enjoy!


Saturday, July 20, 2013

Easy Peasy DIY Teething Necklace

Cali has been teething like crazy these past few days. Drooling like a maniac and chewing on everything she can get her hands on, which ends up being my chest or my shirt when I'm holding her. I decided it was time to step into full on "old lady mom" mode and get a teething necklace for her. Problem was, every one I looked at was more than I could imagine spending. I'm not a jewelry person in the first place and I've had most of my clothes since high school. The ones I've gotten in the past few years have been hand me downs or TJ Maxx sale. The point is that I don't spend money on jewelry.

So I decided to try my hand at being crafty.

This is also something I don't typically do. I'm not a crafty type person. Even though I plan on getting a sewing machine and learning this off season, it's not really something we deem a "necessity" when we pack our car to live out of for the season. And trust me when I say that space is valuable when we move...

This is everything we live with during the season. 

See what I mean? And the back seat is up because they frown on tying your infant to the top of the car.

I kid. I kid.

So while I sewed this necklace by hand, it would probably help you if you have a sewing machine. But if you don't it can be done by hand, you just probably want to go back over your original line with another just to ensure it's strong.

This is the finished product...


So here's what you'll need:

1/4 yd fabric (I used 100% cotton)
Needle & thread
Scissors
Wooden beads (tube or sphere)

That's it! That's my kind of project... Easy.


First you want to cut your fabric to make it about 5 inches wide. Fold it long ways where the underside of the fabric is showing like in the picture above.

Sew the open edges together so that you have a tube.

Next, you'll flip the tube inside of itself so that the pretty side of the fabric is showing. This will take some patience and TLC especially if you've hand sewn it.


Find the middle of the fabric and tie a knot. Then drop a bead into your tube on one side of the knot and bind it in with another knot. Continue doing this on both sides until the necklace is your desired length.


Once you're finished, you can sew the ends together but I just tied mine into, yet another, knot.

Walah!

I don't know if that's how you spell that word...

The point is that you're finished!

From start to end it only took me about an hour. I'll let Cali use it tomorrow and report back with her review.

Until then!